
Passing a California smog test is not a matter of luck; it is a matter of thermal management and digital transparency. Most drivers fail because they treat the test like a surprise pop quiz rather than a scheduled technical audit. To pass, your car’s internal computer must communicate perfectly with the state’s diagnostic equipment while the mechanical components operate at peak efficiency.
Success requires shifting your focus from “fixing a light” to “optimizing the system.” By addressing the specific triggers that technicians look for during the inspection, you can avoid the “Gross Polluter” label and the repair costs that come with it. If you are ready to certify your vehicle, visiting a reputable smog check station with a prepared car is the only way to guarantee a smooth experience.
Key Takeaways
- Drive at highway speeds for at least 20 minutes immediately before the test to ensure the catalytic converter reaches its chemical “light-off” temperature.
- Verify that your “Readiness Monitors” are set using a basic OBD-II scanner, as clearing codes or a dead battery right before the test results in an automatic failure.
- Inspect the rubber seal on your gas cap for cracks, because a tiny pressure leak in the fuel system is one of the most common reasons for a “Failed” certificate.
The “Readiness” Paradox
The most common mistake I see beginners make in the shop is clearing a “Check Engine” light with a cheap scanner in the parking lot of the test center. They assume that if the light is off, the car is fine. In reality, clearing a code also erases the “Readiness Monitors.” These are self-tests the car performs on its own emissions equipment over several days of driving.
If these monitors are “Incomplete,” the technician cannot legally pass the vehicle. California allows most cars to have the “Evap” monitor incomplete, but all others—Catalyst, O2 Sensor, and EGR—must be “Ready.” You must drive the car through a specific “Drive Cycle” to set these flags.
This typically involves starting the car from a cold soak, idling for three minutes, and then driving at a steady 55 mph for ten minutes without using cruise control. If you skip this step, the smog machine will reject the car before the actual tailpipe test even begins. Check your status with a handheld tool to ensure every monitor says “Ready” before you pay for an inspection.
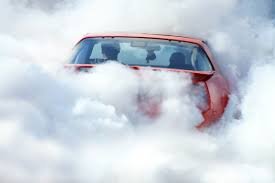
Thermal Saturation and the Catalytic Converter
The catalytic converter is a ceramic honeycomb coated in precious metals. It requires extreme heat to trigger the chemical reaction that neutralizes carbon monoxide and hydrocarbons. Simply “warming up” the engine by idling in your driveway is insufficient. You need thermal saturation, where the entire exhaust system is heat-soaked.
When you are actually standing over the hood of a car that is truly ready for a test, you should feel intense heat radiating from the manifold. The cooling fans should be cycling. This tells you the converter is at its maximum efficiency.
Take the car on the freeway for 15 miles. Keep the RPMs steady. When you arrive at the Los Angeles smog check facility, keep the engine running. If the car sits and cools down for 30 minutes in the waiting line, the precious metals inside the converter may drop below their active temperature, leading to a borderline failure.
Visual Inspection: The “Make or Break” Phase
The smog test begins with a visual inspection. A technician looks for modified air intakes, disconnected vacuum lines, and frayed wiring. If you have an aftermarket “cold air intake” without a California Air Resources Board (CARB) Executive Order sticker, you will fail instantly.
Inspect your vacuum hoses with a bright flashlight. Heat makes rubber brittle over time. A hose that looks fine might actually have a “hidden” crack on the underside where it connects to a plastic port. Gently wiggle the hoses. They should feel firm but pliable.
The microfiber will aggressively grab the paint if you use it on the exterior, so use it here to wipe the grime off the emissions label under the hood. The technician needs to see this label to verify the timing specifications and vacuum routing. If the label is missing or unreadable, it can cause unnecessary delays or a technical failure.
Managing Nitrogen Oxides (NOx) and the Cooling System
High NOx levels are the result of high combustion temperatures. If your engine is running even 10 degrees too hot, your NOx readings will spike. This is often caused by an old radiator, a sticking thermostat, or degraded coolant that can no longer dissipate heat effectively.
Check your coolant level when the engine is cold. Ensure the radiator fins are not clogged with leaves or road debris. A car that “doesn’t overheat” on the dashboard gauge can still be running hot enough in the cylinders to fail the NOx portion of the test.
If your car uses an Exhaust Gas Recirculation (EGR) valve, this component is your best friend for lowering NOx. These valves often get “lazy” due to carbon buildup. Cleaning the EGR ports with a wire brush and specialized spray can restore the flow of inert gas into the cylinders, cooling the combustion and bringing your numbers back into the passing range.
The Gas Cap and the EVAP Test
The Evaporative Emission (EVAP) system prevents gasoline vapors from escaping into the atmosphere. The most common point of failure is the simplest: the gas cap. The rubber O-ring on the cap must provide a perfect, airtight seal.
Inspect your gas cap for “spiderweb” cracks in the rubber gasket. If the rubber feels hard or looks dry-rotted, replace the cap with an Original Equipment (OE) part. Avoid universal “one size fits all” caps, as they often fail the pressurized “Leak Down” test that the smog machine performs on the cap itself.
Additionally, do not fill your gas tank to the very top right before the test. This can saturate the charcoal canister with liquid fuel, causing a “Rich” condition or an EVAP system error. Aim for a tank that is roughly half to three-quarters full for the most consistent sensor readings.
Professional Perspective: The “Fresh Oil” Secret
As a professional, I always look at the oil dipstick before a test. Motor oil naturally absorbs small amounts of unburned gasoline over time. Through the PCV (Positive Crankcase Ventilation) system, these fuel vapors are sucked into the engine and burned.
In an older engine, old oil can release enough fuel vapor to push your Hydrocarbon (HC) levels over the legal limit. Change your oil two days before the test. This gives the new oil time to circulate while ensuring it is as “clean” as possible.
Do not use heavy “oil thickener” additives. These can interfere with Variable Valve Timing (VVT) systems, which rely on specific oil viscosity to adjust the engine’s timing for emissions control. Stick to the manufacturer-recommended weight for the best results.
Final Steps for a Guaranteed Pass
Before you drive into the bay, turn off the air conditioning and all electronics. This reduces the load on the engine, allowing it to run as “light” as possible during the treadmill portion of the test.
Your immediate next action is to perform a visual check of your vacuum lines and verify that your gas cap is tight. Once you have confirmed that your readiness monitors are “Ready” and your engine is fully heat-soaked from a highway drive, head directly to your Los Angeles smog check appointment. By controlling these variables, you move from a position of uncertainty to a position of technical confidence.